If you’re a parent looking for an easy and stress-free way to help your child become a confident reader, this highly rated program is worth exploring.
Affiliate link – at no extra cost to you

In modern web applications, showing the right menu options to the right users is very important. Not every user should see the same links or features. This is where dynamic menus based on user roles and permissions become useful.
Laravel 11 makes it easy to check user roles and permissions using middleware, helpers, or Blade directives. Bootstrap 5.3 helps you design responsive menus that work well on all screen sizes. Together, they allow you to build professional navigation systems with minimal effort.
In this article, you will learn how to structure your menus, check user permissions, and display menu items dynamically using Laravel Blade templates. The goal is to keep everything simple, readable, and easy to maintain.
By the end of this guide, you will understand how dynamic menus work and how to implement them correctly in a Laravel 11 application.
When building web applications with Laravel 11 and Bootstrap 5.3.3, one of the most common challenges developers face is designing dynamic menus based on user roles and permissions. A role-based menu ensures that users only see the content and navigation options they are authorized to access. This is essential for creating a personalized and secure user experience.
In this tutorial, we’ll walk you through the process of designing dynamic menus using Laravel 11 and Bootstrap 5.3.3, focusing on how to adapt the menu based on user roles and permissions. By the end of this post, you’ll be able to implement a menu that shows or hides items dynamically, offering different navigation options to different user roles.
Laravel 11 provides a clean and powerful way to manage authentication, roles, and permissions. When combined with Bootstrap 5.3, you can create responsive and user-friendly navigation menus that automatically change based on who is logged in.
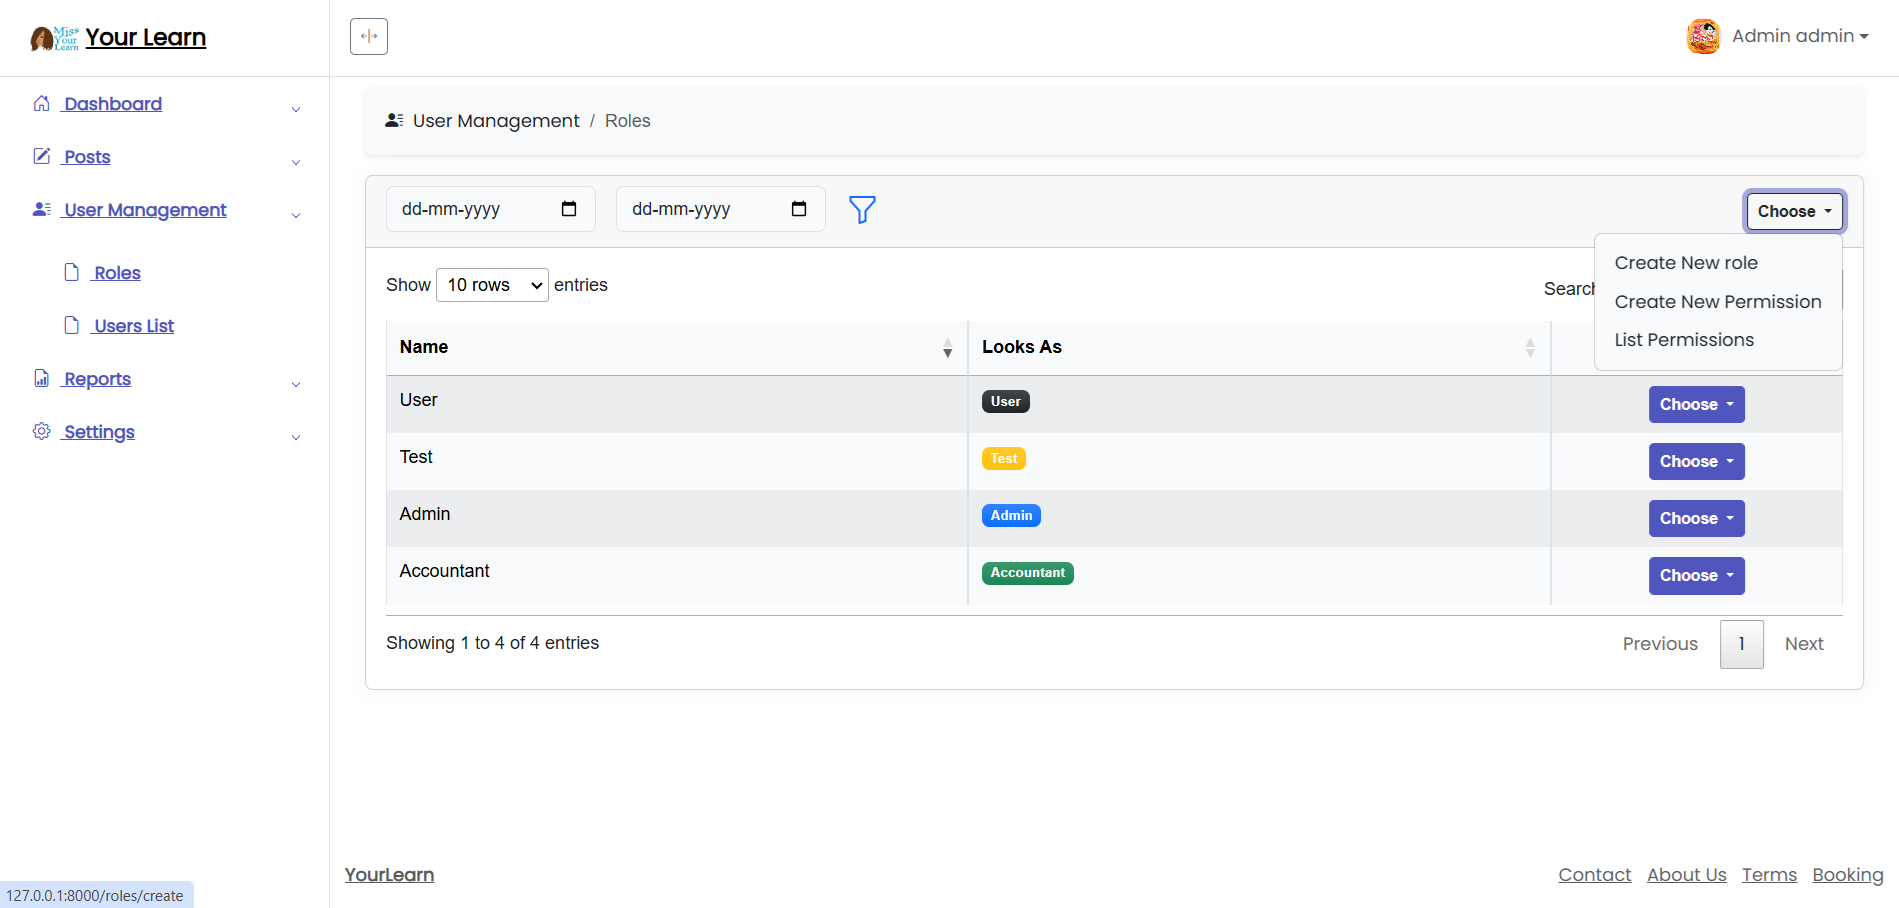
A dynamic menu is a navigation menu that changes its items depending on the user's role. For example, an admin user may see links like Dashboard, User Management, and Settings, while a regular user may only see Home and Profile.
This approach improves security and user experience by hiding unauthorized options and keeping the interface clean and simple.
"require": {
        "php": "^8.2",
        "laravel/framework": "^11.0",
        "laravel/sanctum": "^4.0",
        "laravel/tinker": "^2.9",
        "livewire/livewire": "^3.5",
        "spatie/laravel-permission": "^6.10",
        "yajra/laravel-datatables-buttons": "^11.2",
        "yajra/laravel-datatables-oracle": "^11.1"
    },
    "require-dev": {
        "fakerphp/faker": "^1.23",
        "laravel/pint": "^1.13",
        "laravel/sail": "^1.26",
        "laravel/ui": "^4.5",
        "mockery/mockery": "^1.6",
        "nunomaduro/collision": "^8.0",
        "phpunit/phpunit": "^10.5",
        "spatie/laravel-ignition": "^2.4"
    }
}
This official documentation provides step-by-step instructions for installing Laravel 11, configuring it, and running it on your local development environment. Once users follow this guide, they should be able to set up a basic Laravel installation on their local machine.
First, make sure you have a Laravel project installed. If not, create one using the following command:
composer create-project laravel/laravel yourlearn
cd yourlearn
This sets up a fresh Laravel project where we’ll implement roles, permissions, and dynamic menus.
YourLearn uses roles and permissions to control menu access. Let’s create the necessary tables with migrations.
php artisan make:migration create_roles_table --create=roles
Schema::create('roles', function (Blueprint $table) {
    $table->id();
    $table->string('name')->unique();
    $table->timestamps();
});
php artisan make:migration create_permissions_table --create=permissions
Schema::create('permissions', function (Blueprint $table) {
    $table->id();
    $table->string('name')->unique();
    $table->timestamps();
});
php artisan make:migration create_role_user_table --create=role_user
Schema::create('role_user', function (Blueprint $table) {
    $table->id();
    $table->foreignId('role_id')->constrained()->cascadeOnDelete();
    $table->foreignId('user_id')->constrained()->cascadeOnDelete();
    $table->timestamps();
});
php artisan make:migration create_menus_table --create=menus
Schema::create('menus', function (Blueprint $table) {
    $table->id();
    $table->string('title');
    $table->string('url')->default('#');
    $table->foreignId('parent_id')->default(0);
    $table->integer('sequence')->default(0);
    $table->enum('status', ['active', 'inactive'])->default('active');
    $table->timestamps();
});
After creating migrations, run them to create tables in your database:
php artisan migrate
This creates the users, roles, permissions, role_user, and menus tables.
Create a seeder to add an admin and a regular user with their roles:
php artisan make:seeder UserSeeder
use App\Models\User;
use App\Models\Role;

public function run()
{
    $adminRole = Role::create(['name' => 'admin']);
    $userRole = Role::create(['name' => 'user']);

    $admin = User::create([
        'name' => 'Admin User',
        'email' => 'admin@example.com',
        'password' => bcrypt('password')
    ]);

    $user = User::create([
        'name' => 'Regular User',
        'email' => 'user@example.com',
        'password' => bcrypt('password')
    ]);

    $admin->roles()->attach($adminRole);
    $user->roles()->attach($userRole);
}
Run the seeder:
php artisan db:seed --class=UserSeeder
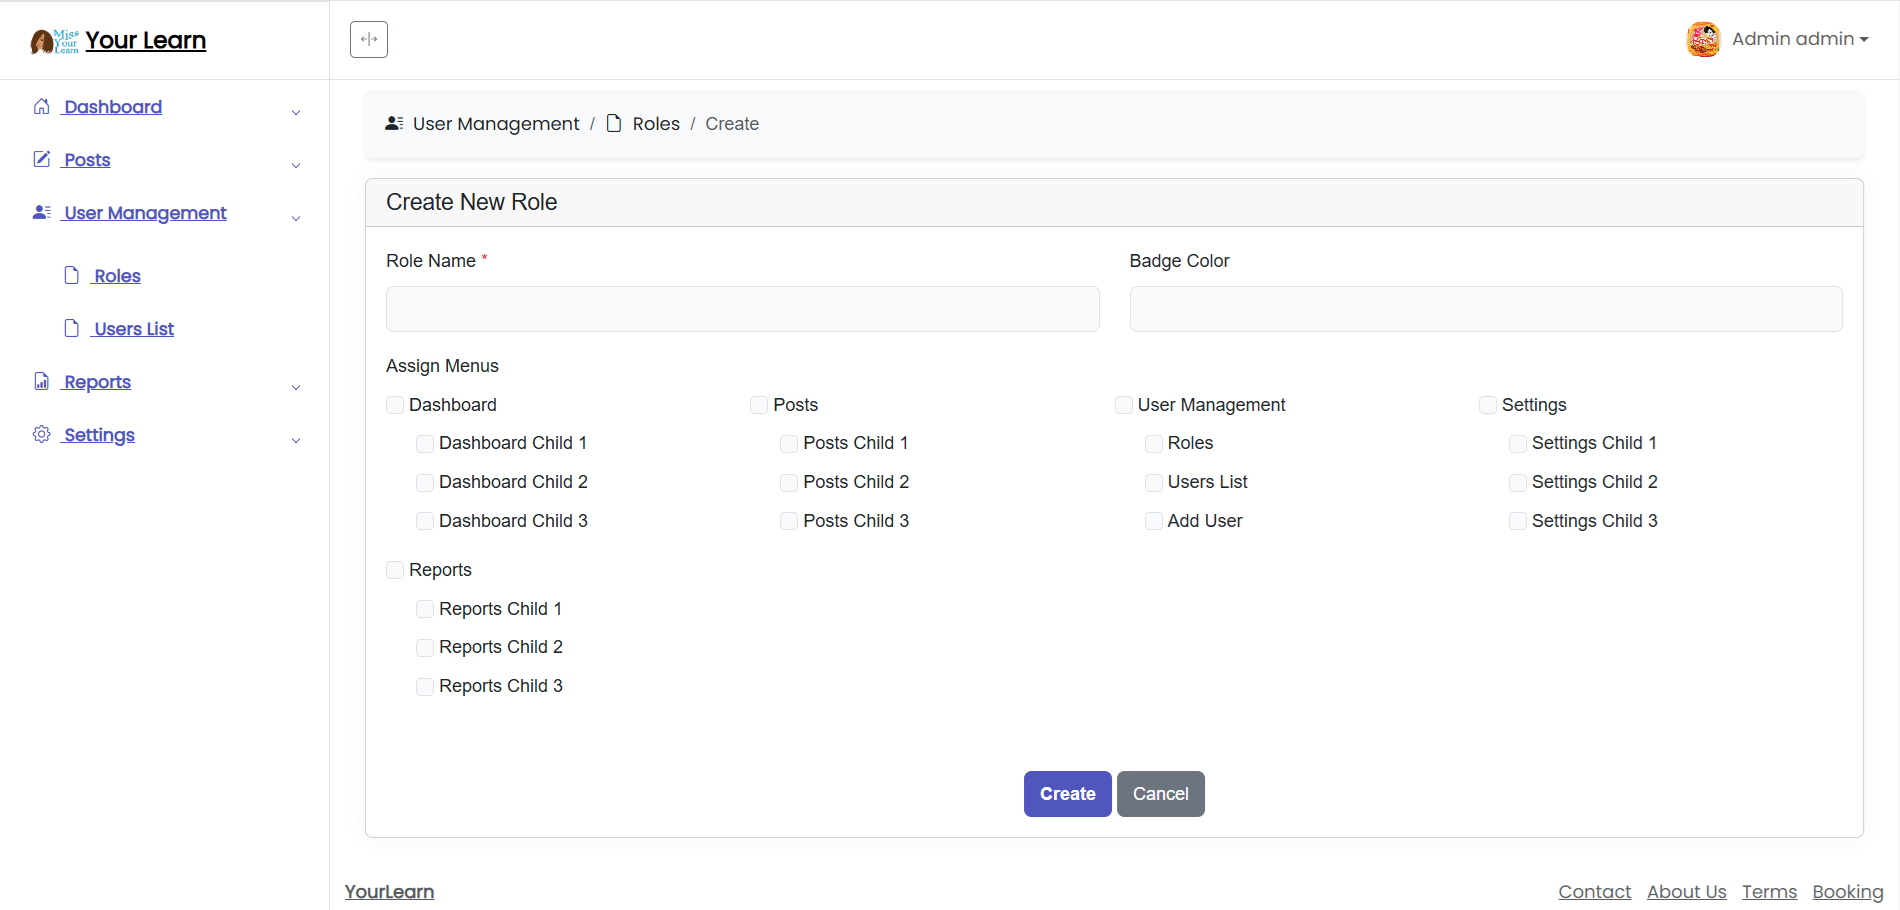
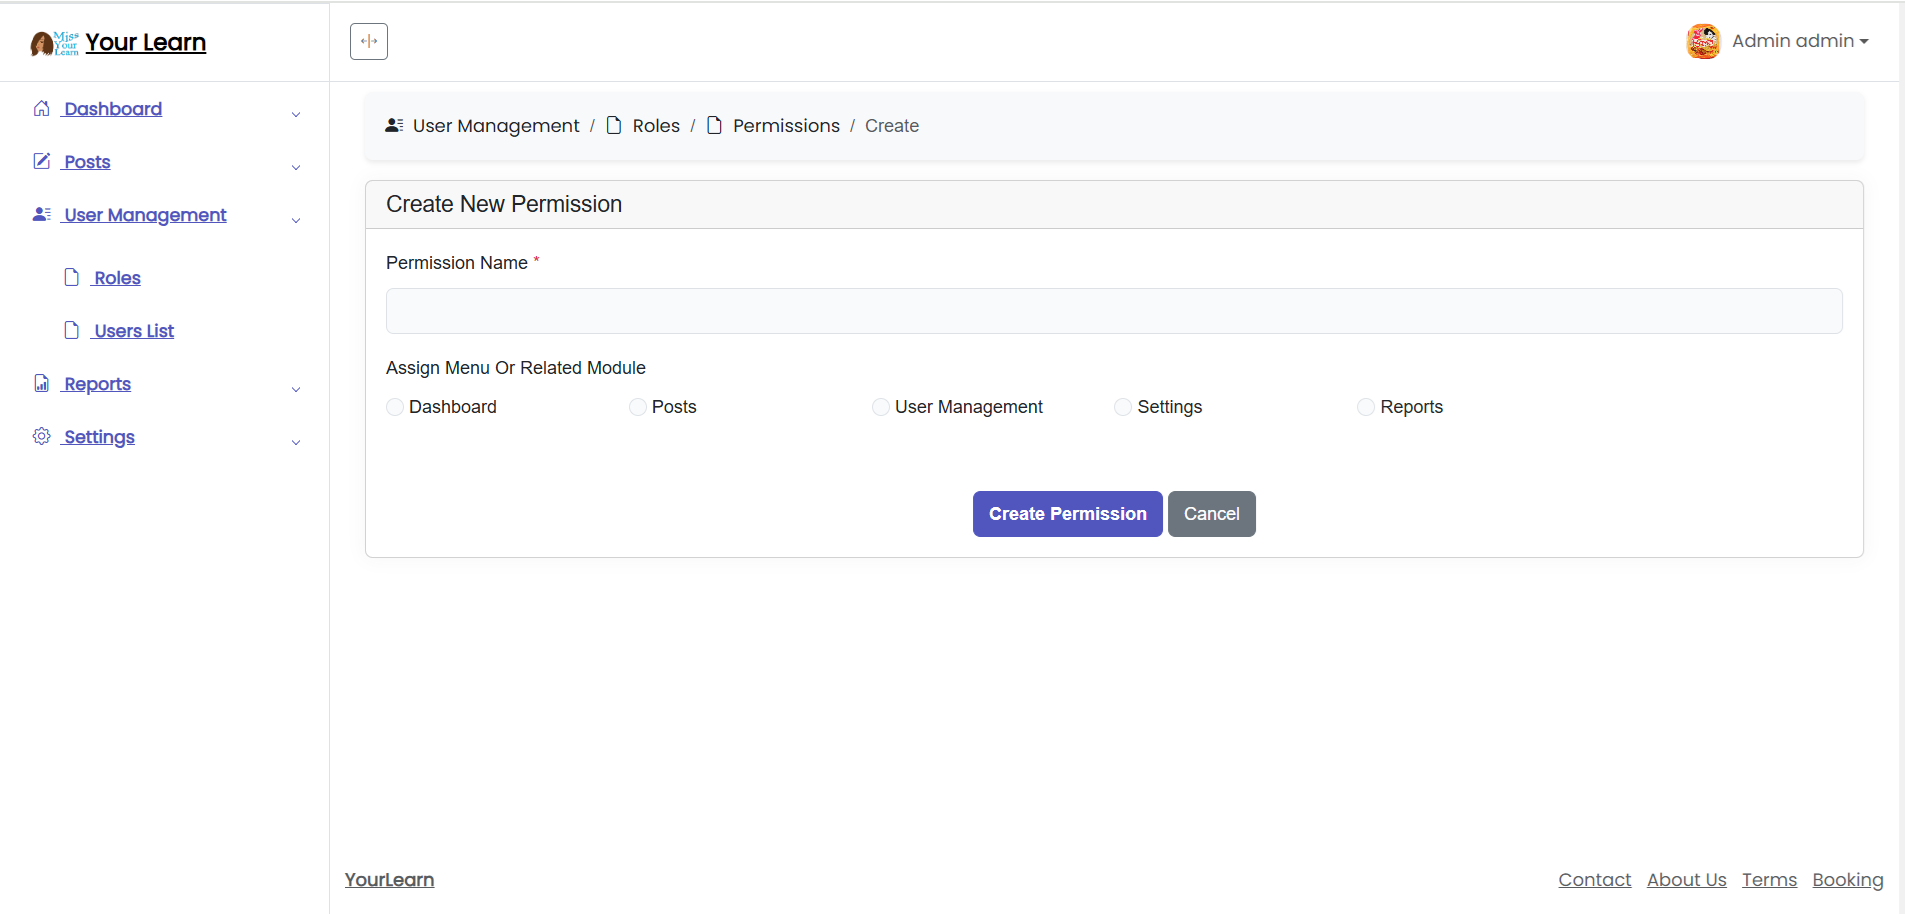
Next, create some menus and assign them to roles. You can use a seeder or manually insert into the database.
use App\Models\Menu;

Menu::create(['title' => 'Dashboard', 'url' => 'dashboard', 'sequence' => 1]);
Menu::create(['title' => 'Users', 'url' => 'users', 'sequence' => 2]);
Menu::create(['title' => 'Settings', 'url' => 'settings', 'sequence' => 3]);
Later, menus are assigned to roles through the pivot table.
The MenuService is the heart of dynamic menus. It retrieves menus based on the user’s roles, filters parent-child menus, applies guard prefixes, and marks active menus.
<?php

namespace App\Services;

use App\Models\Menu;
use App\Services\GuardService;
use Illuminate\Http\Request;

class MenuService
{
    private GuardService $guardService;
    protected $request;

    public function __construct(Request $request){
        $this->guardService = new GuardService();
        $this->request = $request;
    }

    public function generateMenus()
    {
        $guardAndUser = $this->guardService->getCurrentGuardAndUser($this->request);
        $user = $guardAndUser['user'] ?? null;
        $guard = $guardAndUser['guard'] ?? null;

        if (!$user) return collect();

        $roles = $user->roles()->with('menus')->get();
        $assignedMenuIds = $roles->flatMap(fn($role) => $role->menus->pluck('id'))->unique();

        $menus = Menu::with(['children' => fn($query) =>
            $query->whereIn('id', $assignedMenuIds)->where('status', 'active')
        ])
        ->whereIn('id', $assignedMenuIds)
        ->where('parent_id', 0)
        ->where('status', 'active')
        ->orderBy('sequence')
        ->get();

        $menus->each(fn($menu) => $menu->children = $menu->children
            ->filter(fn($child) => $assignedMenuIds->contains($child->id))
            ->sortBy('sequence')
        );

        $currentPath = request()->path();

        $menus->each(function ($menu) use ($currentPath, $guard) {
            $menuUrlWithPrefix = $this->guardService->applyGuardPrefix($menu->url, $guard);
            if ($this->isMenuActive($menuUrlWithPrefix, $currentPath)) $menu->is_active = true;

            foreach ($menu->children as $child) {
                $childUrlWithPrefix = $this->guardService->applyGuardPrefix($child->url, $guard);
                if ($this->isMenuActive($childUrlWithPrefix, $currentPath)) {
                    $child->is_active = true;
                    $menu->is_active = true;
                }
            }
        });

        $menus->each(function ($menu) use ($guard) {
            if ($menu->url !== '#') $menu->url = $this->guardService->applyGuardPrefix($menu->url, $guard);
            $menu->children->each(fn($child) =>
                $child->url !== '#' ? $child->url = $this->guardService->applyGuardPrefix($child->url, $guard) : null
            );
        });

        return $menus;
    }

    private function isMenuActive($menuUrl, $currentPath)
    {
        return trim($menuUrl, '/') === trim($currentPath, '/');
    }
}
Explanation:
GuardService.@php
$menus = app(\App\Services\MenuService::class)->generateMenus();
@endphp
@foreach($menus as $menu)
<li class="nav-item {{ $menu->is_active ? 'active' : '' }}">
<a href="{{ $menu->url }}">{{ $menu->title }}</a>
@if($menu->children->count())
<ul>
@foreach($menu->children as $child)
<li class="{{ $child->is_active ? 'active' : '' }}">
<a href="{{ $child->url }}">{{ $child->title }}</a>
</li>
@endforeach
</ul>
@endif
</li>
@endforeach
This renders the menus dynamically, highlights the active page, and shows child menus only if the user has permission.
User Logs In
     │
     ▼
GuardService → Get Current User & Guard
     │
     ▼
MenuService::generateMenus()
     │
     ├─ Load Roles → Assigned Menus
     ├─ Filter Parent & Children
     ├─ Mark Active Menus
     ├─ Apply Guard Prefix
     ▼
Return Menus Collection
     │
     ▼
Sidebar Blade → Renders Menus Dynamically
Now your Laravel app has secure, dynamic menus that change depending on roles and permissions.
If you’re a parent looking for an easy and stress-free way to help your child become a confident reader, this highly rated program is worth exploring.
Affiliate link – at no extra cost to you
<?php
namespace App\DataTables;
use App\Models\User;
use App\Models\Role;
use Illuminate\Database\Eloquent\Builder as QueryBuilder;
use Yajra\DataTables\EloquentDataTable;
use Yajra\DataTables\Html\Builder as HtmlBuilder;
use Yajra\DataTables\Html\Button;
use Yajra\DataTables\Html\Column;
use Illuminate\Support\Facades\Auth;
use Yajra\DataTables\Services\DataTable;
use Carbon\Carbon;

class RolesDataTable extends DataTable
{
    protected $userPermissions;

    public function __construct()
    {
        $this->userPermissions = Auth::user()->availablePermissions()->pluck('slug');
    }

    /**
     * Build the DataTable class.
     *
     * @param \Illuminate\Database\Eloquent\Builder $query Results from query() method.
     */
    public function dataTable($query): EloquentDataTable
    {
        return (new EloquentDataTable($query))
            ->addColumn('action', function ($role) {
                $userPermissions=$this->userPermissions;
                return view('roles.action', compact('role','userPermissions'));
            })
            ->setRowId('id')
            ->editColumn('created_at', function ($role) {
                return $role->created_at->format('d-m-Y H:i:s');
            })
            ->editColumn('name', function ($role) {
                return '' . ucfirst($role->name) . '';
            })->editColumn('badge_color', function ($role) {
                return '<span class="badge '.$role->badge_color.'">' . ucfirst($role->name) . '</span>';
            })

            ->rawColumns(['action', 'name','badge_color']);
    }

    public function querySimple(Role $model): QueryBuilder
    {
        return $model->newQuery();
    }

    public function query(Role $model): QueryBuilder
    {
        $query = $model->newQuery();
        if (request()->filled('start_date') && request()->filled('end_date')) {
            $startDate = request()->input('start_date');
            $endDate = request()->input('end_date');

            $query->whereBetween('created_at', [
                Carbon::parse($startDate)->startOfDay(),
                Carbon::parse($endDate)->endOfDay()
            ]);
        }

        return $query;
    }

    public function html(): HtmlBuilder{

        return $this->builder()
            ->setTableId('roles-table')
            ->columns($this->getColumns())
            ->minifiedAjax()
            ->orderBy(1)
            ->selectStyleSingle()
            ->buttons([
                Button::make('excel'),
                Button::make('csv'),
                Button::make('pdf'),
                Button::make('print'),
                Button::make('reset'),
                Button::make('reload')
            ])
            ->addTableClass('table py-2 table-bordered table-sm table-striped table-responsive w-100')
            ->parameters([
                'scrollX' => false,
                'lengthMenu' => [
                    [10, 25, 50, 100, -1],
                    ['10 rows', '25 rows', '50 rows', '100 rows', 'Show all']
                ],
                'language' => [
                    'className' => 'form-control form-control-solid w-250px ps-14',
                    'searchPlaceholder' => 'Search Report',
                    'zeroRecords' => 'No data available in this table. Please apply filters to get results.',
                    'emptyTable' => 'No matching records found',
                ],
                'columnDefs' => [
                    [
                        'targets' => 0,
                        'visible' => false,
                    ],
                ],
            ])->postAjax(route('roles.index'));
    }

    /**
     * Get the dataTable columns definition.
     */

    public function getColumns(): array
    {

        $canEdit = $this->userPermissions->contains('edit-role');
        $canDelete = $this->userPermissions->contains('remove-role');
        $canAssign = $this->userPermissions->contains('assign-permissions');

        $columns = [
            Column::make('id')->width('10%'),
            Column::make('name')->width('40%'),
            Column::make('badge_color')->title('Looks As')->width('40%'),
        ];

        if ($canEdit || $canDelete || $canAssign) {
            $columns[] = Column::computed('action')
            ->exportable(true)
            ->printable(true)
            ->width('30%')
            ->addClass('text-center');
        }

        return $columns;
    }

    public function show(Role $role)
    {
        return view('roles.show', compact('role'));
    }

    /**
     * Get the filename for export.
     */
    protected function filename(): string
    {
        return 'Roles_' . date('YmdHis');
    }
}
By developing a role-driven sidebar template in Laravel 11 with Bootstrap 5.3.3, you can ensure that your web application offers a dynamic, secure, and user-friendly navigation experience. Whether you’re working on an admin panel or a customer-facing application, implementing role-based menus allows you to control access to sensitive areas and enhance the overall user experience.
If you’re looking for a ready-made solution or want to explore more examples of role-based menu systems and Laravel + Bootstrap integration, feel free to check out my GitHub repository. I share full code examples, templates, and other useful resources to help you speed up your development process.
Visit my GitHub: Download the Laravel 11 Menu Roles Permissions Project from GitHub