
Setting Up Laravel API Project Using Docker Step-by-Step Article
This guide explains how to run Next.js as a frontend, Laravel as a REST API backend, and OpenAI Whisper AI for speech-to-text, all on a Windows system using WAMP.
In this setup, existing PHP projects are already running on WAMP, and we do not want to change or disrupt any current configurations. To avoid conflicts, we use Docker inside the wamp/www directory. This approach allows you to run modern tools like Next.js and Laravel in isolated containers, while keeping your WAMP environment untouched.
By using Docker, you get better project isolation, easier dependency management, and more flexibility. At the same time, you can continue using WAMP exactly as before.
Why Use Docker with WAMP?
Running Docker inside the WAMP www folder gives you the best of both worlds:
- Existing WAMP projects remain unchanged
- No conflicts with PHP or Apache versions
- Easy management of Laravel and Next.js
- Clean separation between old and new projects
- Local development stays fast and stable
This method is ideal if you already rely on WAMP and want to modernize your workflow safely.
Prerequisites
Before you begin, make sure the following tools are installed on your system:
- Docker Installed On Windows
- Windows 10 or 11
- WAMP Server installed and running
- PHP 8.1 or higher
- Composer
- Node.js 18+
- npm or yarn
- OpenAI API key (for Whisper AI)
What This Article Covers
In this article, we walk through:
- Using Docker inside a WAMP environment
- Running Laravel 11 as a REST API
- Running Next.js as the frontend
- Integrating OpenAI Whisper for voice-to-text
- Working entirely on localhost in Windows
This guide does not cover the installation steps for Laravel or Next.js. You can follow the official documentation for installing both frameworks.
What Is OpenAI Whisper?
OpenAI Whisper (also called Whisper AI) is an automatic speech recognition (ASR) system developed by OpenAI. It converts spoken audio into written text and supports multiple languages.
Whisper is commonly used for:
- Speech-to-text features
- Audio transcription
- Voice-based applications
In this setup, Whisper will be connected to the Laravel API and accessed from the Next.js frontend.
Learn AI From Scratch
If you’re looking for a structured introduction to AI, this beginner-friendly course is a perfect starting point. It covers the fundamentals of artificial intelligence and provides step-by-step guidance for hands-on learning.
Affiliate link – at no extra cost to you: Explore the AI Beginner Course
Since I'm using Windows 10 with WAMP already running locally, I prefer to run Docker inside WSL2. This approach:
- Prevents port conflicts with Apache and MySQL on Windows
- Ensures Whisper AI runs smoothly, as it requires Linux-based tools
- Keeps the local development environment stable and isolated
Using WSL2 makes it easy to run modern development tools without interfering with your existing WAMP setup.
1. Download and Install WAMP
First, download the latest version of WampServer for Windows: Get the latest WampServer installer
Once downloaded, follow the on-screen instructions to install WAMP on your Windows system. This will set up Apache, MySQL, and PHP so you can run your local development projects smoothly.
After installing WAMP, create a folder inside D:\wamp64\www\medical-ai-tool and set up the required folder structure and files for your project. Since WAMP is installed on the D: drive, make sure you are using the latest version of PHP. If your current WAMP installation does not include the latest PHP version, you can download PHP 8.0, 8.1, or 8.2 and add it to WAMP using the PHP add-on feature. Using the latest PHP ensures that your Laravel and Next.js projects run smoothly and take advantage of modern PHP features.
medical-ai-tool
 ├── backend/
 ├── frontend/
 ├── .env
 └── docker-compose.yml
The Logic and API Hub: Your API for your web application built in Laravel Framwork. The High-Performance, SEO-First Interface: We will put all front js code inside this directory. Configuration Manager:Environment-specific settings database credentials. Environment Blueprint: Defines how the multiple services (Laravel backend, Next.js frontend, Wishper) are built, configured, and linked.
Component
Technology Stack
Role & Strategic Advantage
backendLaravel
frontendNext.js 15
.envEnv File
docker-compose.ymlEnv File
2. Download and Install Docker on Windows
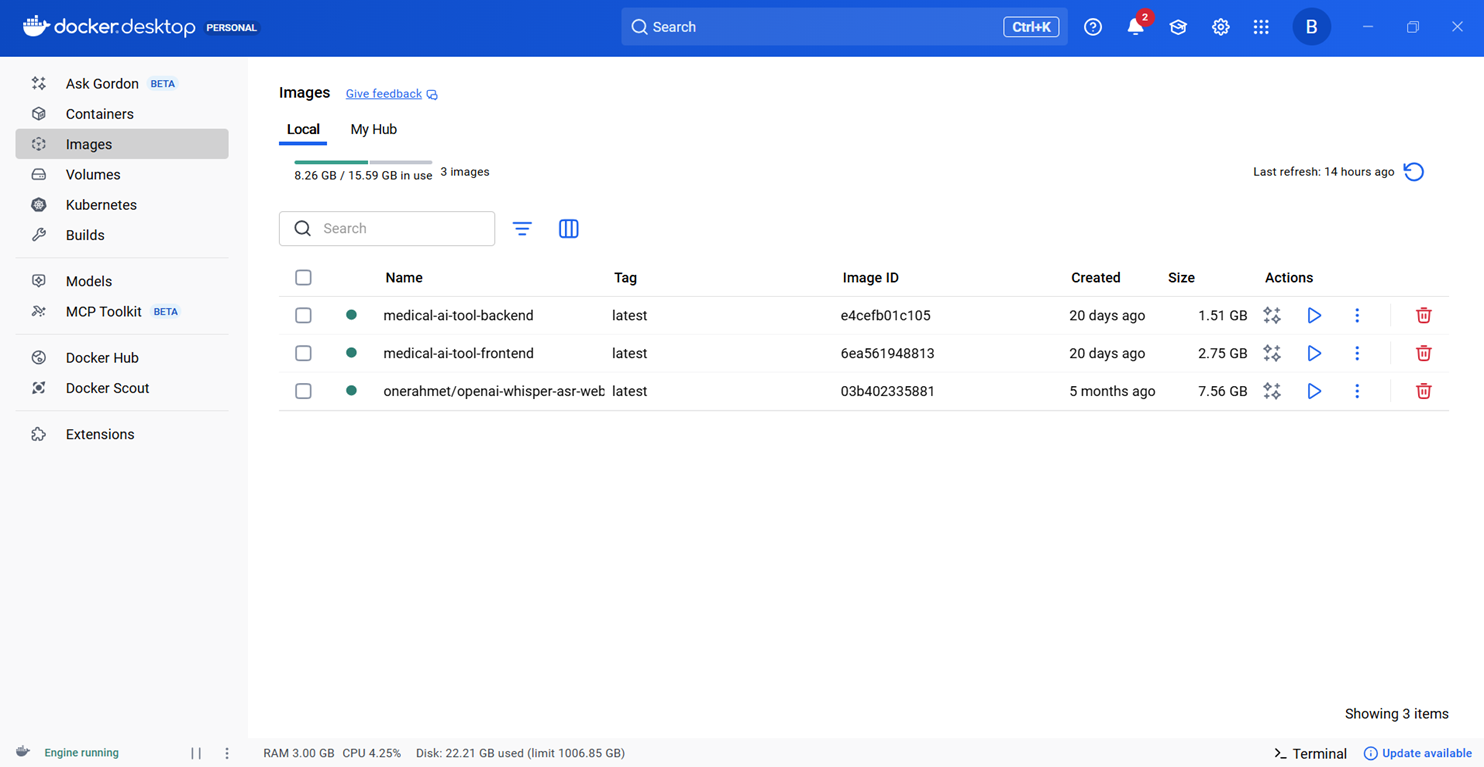
Go to the official Docker website to download and install Docker on your Windows system. After installation, open the Docker dashboard; since this is a fresh installation, no containers will appear initially. Once you have configured your frontend with Next.js 15, backend with Laravel 11, and Whisper AI for audio-to-text, your running containers will appear on the dashboard as shown in the screenshot below.
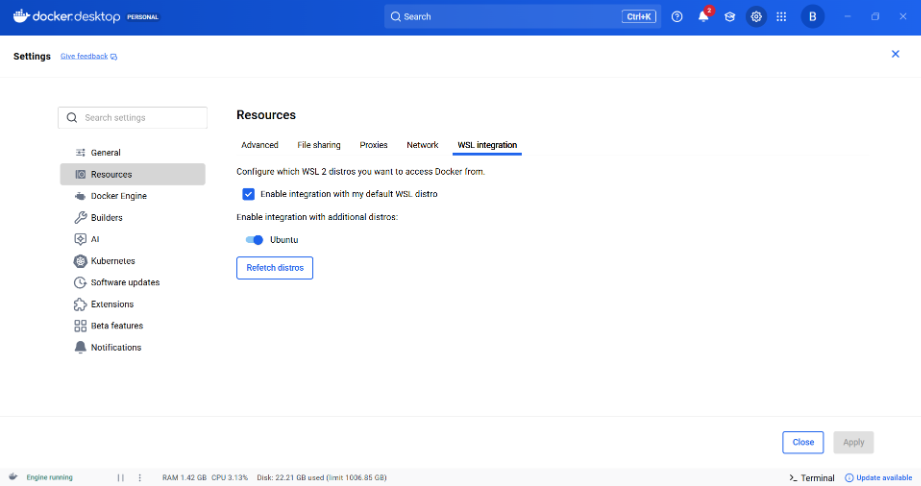
Next, go to Resources in Docker, then select the WSL Integration tab. Here, check both options: Enable integration with my default WSL distro and Enable integration with additional distros, then select Ubuntu and install it. After completing these steps, your screen should look like the example shown below.
									     {
  "builder": {
    "gc": {
      "defaultKeepStorage": "20GB",
      "enabled": true
    }
  },
  "dns": [
    "8.8.8.8",
    "1.1.1.1"
  ],
  "experimental": false,
  "registry-mirrors": [
    "https://mirror.gcr.io"
  ]
}
Open PowerShell as Administrator and run Below command , WSL (Windows Subsystem for Linux) WSL is a Windows feature that lets you run a real Linux environment directly inside Windows—without a virtual machine or dual boot , after installation you can also use Win+r command and can type wsl to open wsl command prompt.
wsl --install
3. Create a .env For Your Project
In the root folder of your project medical-ai-tool, create a .env file. This file will only contain the MySQL database credentials required for your Laravel backend to connect to the database.
DB_HOST=mysql
DB_PORT=3306
DB_DATABASE=medicalAiTool
DB_USERNAME=medical_user
DB_PASSWORD=123123
DB_ROOT_PASSWORD=123123
4. Create docker-compose.yml file
In the root folder of your project, create a docker-compose.yml file. This file will define all the services, including your frontend (Next.js 15), backend (Laravel 11), and Whisper AI, so Docker can build and run them together. Below is an example configuration you can use for your project.
services:
  # 1. The Laravel API Backend Service
  backend:
    build:
      context: ./backend
      dockerfile: Dockerfile
    container_name: laravel-backend
    ports:
      - "8000:8000"
    volumes:
      - ./backend:/var/www/html
      - vendor_data:/var/www/html/vendor
    environment:
      - DB_CONNECTION=mysql
      # *** KEY CHANGE: Connects to your Windows Host (WAMP) ***
      - DB_HOST=host.docker.internal
      - DB_PORT=3306
      - DB_DATABASE=medicalAiTool
      - DB_USERNAME=medical_remote_user
      - DB_PASSWORD=123123
    extra_hosts:                   # ? must be at same indent level as "environment"
      - "host.docker.internal:host-gateway"
    networks:
      - app-network
    depends_on:
      - whisper-api # <-- The backend only depends on the Whisper API now

  # 2. The Next.js Frontend Service
  frontend:
    build:
      context: ./frontend
      dockerfile: Dockerfile
    container_name: nextjs-frontend
    ports:
      - "3000:3000"
    volumes:
      - ./frontend:/app
      - /app/node_modules
    environment:
      - CHOKIDAR_USEPOLLING=true
      - NEXT_PUBLIC_BACKEND_URL=http://backend:8000/api
    networks:
      - app-network
    command: npm run dev
    stdin_open: true
    tty: true

  # 3. The Whisper API Service for transcription
  whisper-api:
    image: onerahmet/openai-whisper-asr-webservice
    container_name: whisper-api
    ports:
      - "9000:9000"
    environment:
      - MODEL_NAME=base
      - WHISPER_FP16=false
    networks:
      - app-network
    restart: unless-stopped
    volumes:
    - whisper_cache:/root/.cache/whisper

volumes:
  # db_data volume is removed as you are using WAMP's MySQL
  vendor_data:     # Cache for backend Composer dependencies
  whisper_cache:   # Cache for Whisper model files

networks:
  app-network:
    driver: bridge
5. Setup Frontend and Backend Folders
At this point, your project should contain only two folders: frontend and backend. The Next.js project will go into the frontend folder, which you can set up by following the official Next.js installation guide. Inside this folder, create a Dockerfile (or use an existing one if you have it) and paste the necessary configuration code into it as shown below.
# Use an official Node.js image as the base
FROM node:18-alpine

# Set the working directory
WORKDIR /app

# Copy package.json and package-lock.json to install dependencies
COPY package*.json ./

# Install dependencies
RUN npm install

# Copy the rest of your application code
COPY . .

# Expose the port Next.js runs on
EXPOSE 3000

# Start the development server
CMD ["npm", "run", "dev"]
6. Setup Backend Folder
The remaining folder is backend, where you will install Laravel. In the root of this folder, create a Dockerfile (if one does not already exist) and add the required configuration content to it as shown below. This Dockerfile will ensure that your Laravel backend runs correctly inside the Docker container.
# Use an official PHP image as the base
FROM php:8.2-fpm

# Install system dependencies and PHP extensions
RUN apt-get update && apt-get install -y \
    git \
    curl \
    libzip-dev \
    libonig-dev \
    libpng-dev \
    libjpeg-dev \
    libfreetype6-dev \
    libxml2-dev \
    zip \
    unzip \
    libicu-dev \
    g++ \
    libwebp-dev

# Configure and install PHP extensions
RUN docker-php-ext-configure gd --with-freetype --with-jpeg --with-webp
RUN docker-php-ext-install pdo pdo_mysql mbstring exif pcntl bcmath gd intl zip

# Set the working directory inside the container
WORKDIR /var/www/html

# Copy the application files from your host to the container
COPY . .

# Expose port 80 and start PHP-FPM
#EXPOSE 80
#CMD ["php-fpm"]

# Expose Laravel's built-in dev server
EXPOSE 8000
CMD ["php", "artisan", "serve", "--host=0.0.0.0", "--port=8000"]
7. Run Your Project In WSL
After completing the previous steps, open the WSL command prompt and navigate to your project directory using the cd command. For example:
boy108zon@DESKTOP-1VQRVOC:/mnt/c/Users/Dell$ cd /mnt/d/wamp64/www/medical-ai-tool
Once inside the project folder, run the first two commands to build your environment. If everything goes well, use the third command to start Docker and bring up all services, including Laravel, Next.js, and Whisper AI. The benefit of this setup is that you do not need to run separate commands for each service—Docker handles everything together. Keep in mind that the docker build command may take some time to complete, but this only happens once during the initial setup.
1. cd /mnt/d/wamp64/www/medical-ai-tool
2. docker-compose build
3. docker-compose up
4. docker-compose down
8. Run Docker and Test Your Application
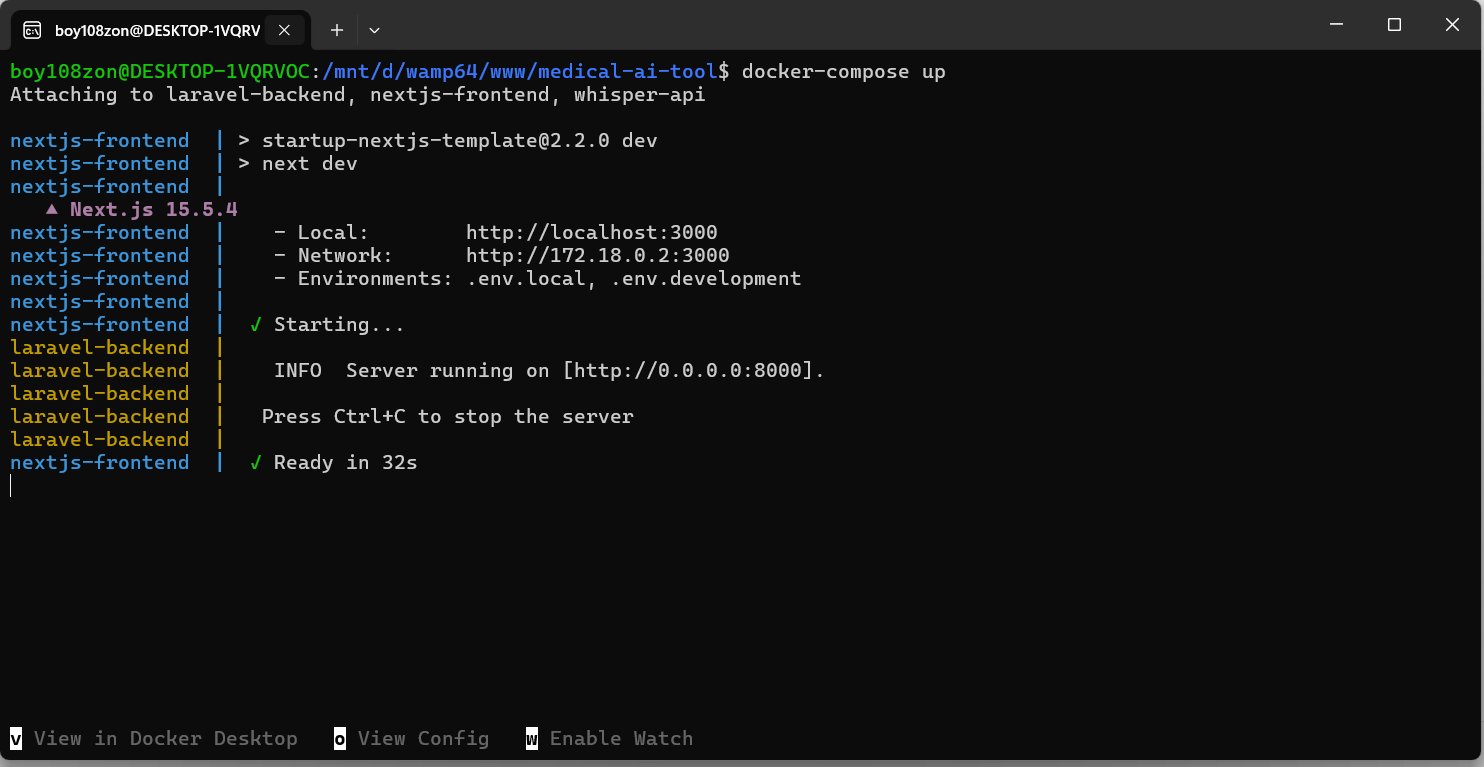
Running docker-compose up will start all your services and display the dashboard shown below. You can access the frontend by opening http://localhost:3000 in your browser. The console will show messages indicating that the page is compiling, and once the compilation is complete, the page will load successfully. You can then test an example AI speech-to-text application using OpenAI Whisper, running entirely on your local machine.
Running docker-compose up will start all your services and display the dashboard shown below. You can access the frontend by opening http://localhost:3000 in your browser. The console will show messages indicating that the page is compiling, and once the compilation is complete, the page will load successfully. You can then test an example AI speech-to-text application using OpenAI Whisper, running entirely on your local machine.
On the backend, create a controller using Laravel (or CodeIgniter, if preferred). This controller will receive a WAV audio file, send it to Whisper, and return the transcribed text to your frontend—whether you are using Next.js or another frontend framework. This setup allows you to handle audio-to-text processing fully within your local environment.
9. Laravel API Configuration – Backend
After installing Laravel in your backend folder, you need to configure your application for proper functionality. First, update your .env file by adding the necessary lines as instructed for your environment. Next, configure CORS (Cross-Origin Resource Sharing) by opening backend/config/cors.php. This file controls which external domains, HTTP methods, and headers are allowed to access your Laravel application. You can either replace the existing content with the provided configuration or copy and paste the required lines into the file. Setting up CORS correctly ensures that your frontend can communicate safely with the Laravel backend, including sending authentication cookies if needed.
1. SANCTUM_STATEFUL_DOMAINS=localhost,localhost:3000,127.0.0.1,doctorapis.localhost.com


2. <?php

return [

    'paths' => ['api/*', 'sanctum/csrf-cookie', 'login', 'logout'],

    'allowed_methods' => ['*'],

    'allowed_origins' => [
        'http://localhost:3000',
        'http://doctorapis.localhost.com',
    ],

    'allowed_origins_patterns' => [],

    'allowed_headers' => ['*'],

    'exposed_headers' => [],

    'max_age' => 0,

    'supports_credentials' => true,

];
10. Example Convert Audio To text
For example, the Laravel controller below demonstrates how to convert audio to text using Whisper AI on your local machine. The controller receives an audio file, processes it with Whisper, and returns the transcribed text to your Next.js frontend. This example shows how your backend and frontend can communicate seamlessly for real-time audio-to-text functionality.
<?php
namespace App\Http\Controllers\Api;

use App\Http\Controllers\Controller;
use Illuminate\Http\Request;
use App\Traits\ApiResponse;
use App\Models\Appointment;
use Illuminate\Support\Facades\Log;

class TranscriptionController extends Controller
{
     use ApiResponse;

    public function __construct(){

        $this->middleware('auth:sanctum')->only(['transcribe']);
    }

    public function transcribe(Request $request)
    {
        $request->validate([
            'audio' => 'required|file|mimes:mp3,wav,webm|max:10240',
            'appointment_id' => 'required|integer|exists:appointments,id',
        ]);

        $audioFile = $request->file('audio');
        $appointmentId = $request->appointment_id;

        try {

            $client = new \GuzzleHttp\Client();

            $response = $client->post('http://whisper-api:9000/asr', [
                'multipart' => [
                    [
                        'name'     => 'audio_file',
                        'contents' => fopen($audioFile->getPathname(), 'r'),
                        'filename' => $audioFile->getClientOriginalName(),
                    ],
                    [
                        'name'     => 'language',
                        'contents' => 'en',
                    ],
                    [
                        'name'     => 'model_name',
                        'contents' => 'base',
                    ]
                ]
            ]);

            $transcript = (string) $response->getBody();
            $filename = $appointmentId . '_' . time() . '.' . $audioFile->getClientOriginalExtension();
            $audioPath = $audioFile->storeAs('audio_inputs', $filename);


            $appointment = Appointment::findOrFail($appointmentId);
            $appointment->audio_path = $audioPath;
            $appointment->transcript = $transcript;
            $appointment->save();

            return response()->json([
                'text' => $transcript,
                'audio_path' => $audioPath,
            ]);

        } catch (\Exception $e) {
            Log::error('Transcription failed: ' . $e->getMessage());
            return response()->json(['error' => 'Transcription failed'], 500);
        }
    }
}
11. Conclusion
Setting up a full AI-powered speech-to-text application on Windows using Docker, OpenAI Whisper, Next.js, and Laravel may seem complex at first, but the process becomes straightforward once each component is configured correctly.
Using Docker eliminates dependency conflicts and ensures that the frontend, backend, and Whisper ASR service run consistently across environments. With WAMP managing the MySQL database, Laravel handling the API backend, and Next.js powering the frontend, your full-stack application is now fully integrated and running smoothly on localhost. Whisper functions as a local transcription service, enabling your app to process audio quickly and accurately. This setup provides a solid foundation for building advanced AI applications, whether for speech transcription, medical tools, productivity apps, or any future AI-driven projects.