
Manage S3 Buckets with Laravel & PHP: Upload, Create, Configure Policies, IAM Users, and Bucket Policy Permissions
Uploading files to an Amazon S3 bucket is a key task in modern web development, enabling developers to securely store and manage large amounts of data in the cloud. Amazon S3 (Simple Storage Service) is a highly scalable and reliable solution for file storage, making it an ideal choice for various applications, including web hosting, data backup, and content delivery. To programmatically upload files to an S3 bucket, developers can utilize the AWS SDK (Software Development Kit), which provides APIs to interact with AWS services from their applications. Here's an overview of the general process:
First, developers must create an AWS account and set up an S3 bucket. This can be done through the AWS Management Console or programmatically using the AWS CLI (Command Line Interface) or SDK. Once the S3 bucket is created, the next step is to integrate the AWS SDK into your application. For JavaScript-based applications, such as a web application or a Node.js server, developers can use the AWS SDK for JavaScript/Node.js. After integrating the SDK, developers need to configure it with their AWS credentials and specify the region where the S3 bucket is located. This typically involves creating an AWS IAM (Identity and Access Management) user with the appropriate permissions for accessing the S3 bucket and generating access keys.
With the AWS SDK properly configured, developers can use its APIs to upload files to the S3 bucket. The process involves specifying the file to be uploaded, the target S3 bucket, and the key (or file path) where the file will be stored. The SDK handles the process of uploading the file to S3, including authentication, encryption, and error handling. Once the file upload is completed, the file is securely stored in the S3 bucket and can be accessed or managed via the AWS Management Console or programmatically using the SDK.
For web applications requiring integration with Amazon S3 for file uploads, particularly when using PHP or frameworks like Laravel, several configuration steps are necessary. Here’s a breakdown of the required steps:
- Create an S3 Bucket: You must create an S3 bucket on your AWS account.
- Add IAM User: You need to create an IAM (Identity and Access Management) user with the appropriate permissions to interact with the S3 bucket.
- Generate Policies: Use the AWS Policy Generator to generate the necessary permissions for the IAM user.
- Configure CORS (Cross-Origin Resource Sharing): Set up CORS to allow secure cross-origin requests to your S3 bucket from different domains.
Once these configurations are in place, you’ll be ready to upload files to your S3 bucket from your Laravel application or even from a simple PHP setup without any framework. To begin, log in to your AWS account and follow the detailed configuration steps above. Afterward, you’ll be able to upload files, images, and other content to your S3 bucket, either via a Laravel application or a custom PHP solution.
1. Creating S3 Bucket
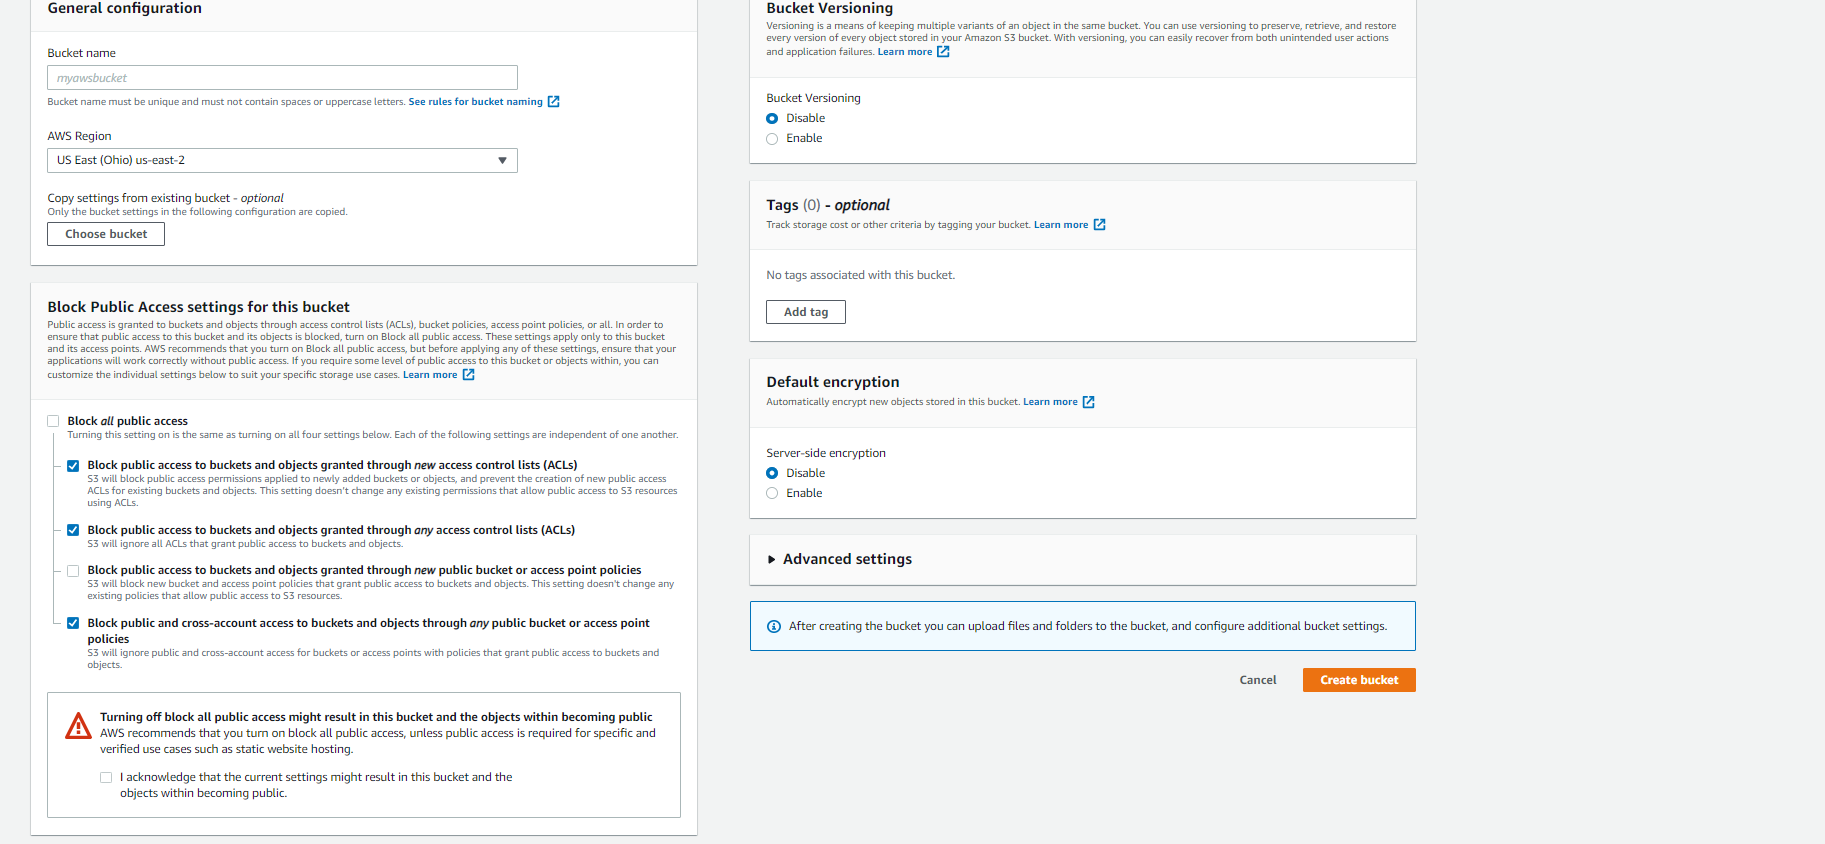
Just go to amazon console and login and find the Storage under it click on S3 , You can see below screen fill it up there Bucket Name is of your choice, AWS Region select your Region , Block Public Access settings for this bucket uncheck "Block public access to buckets and objects granted through new public bucket or access point policies" , Bucket Versioning You can enable it or disable it based on your requirement as per little information given below is "You can easily recover from both unintended user actions and application failures." matters enable it if you want this. Tags again a little information given there is "Track storage cost or other criteria by tagging your bucket" I needed this as well as Bucket Versioning so enable for my project. you can also configure and change this option latter.Some time what happened you know we Configure basic things and after successful TEST We can enable change other option configuration.
If you want only a TEST then when you are creating a s3 bucket just on this section "Block Public Access settings for this bucket" change and rest of things will be default. Click on create bucket your bucket will be created and listed there.
2. Add User
Just click Services on top navigation then find "Security, Identity, & Compliance" then IAM click on it then in side bar panel click on Users then see there and click on Add users. there will be 5 steps just click on Next then on last steps click on create user , These keys needed in PHP Environment for uploading files , images , document to s3 bucket.
3. Bucket Policy
Click on bucket you created and then go to Permissions Tab scroll down you will see Bucket policy , just click on edit , there you will see a Policy generator click on it , for generating policy Select Type of Policy as "S3 Bucket Policy" and in Actions select DeleteObject, GetBucketLocation, GetObject, ListBucket , PutObject, Amazon Resource Name (ARN) put this arn:aws:s3:::lamybuckettest,arn:aws:s3:::lamybuckettest/* with comma separated and replace lamybuckettest with your bucket you created. Now click on generate policy and just copy it and paste it to Bucket Policy.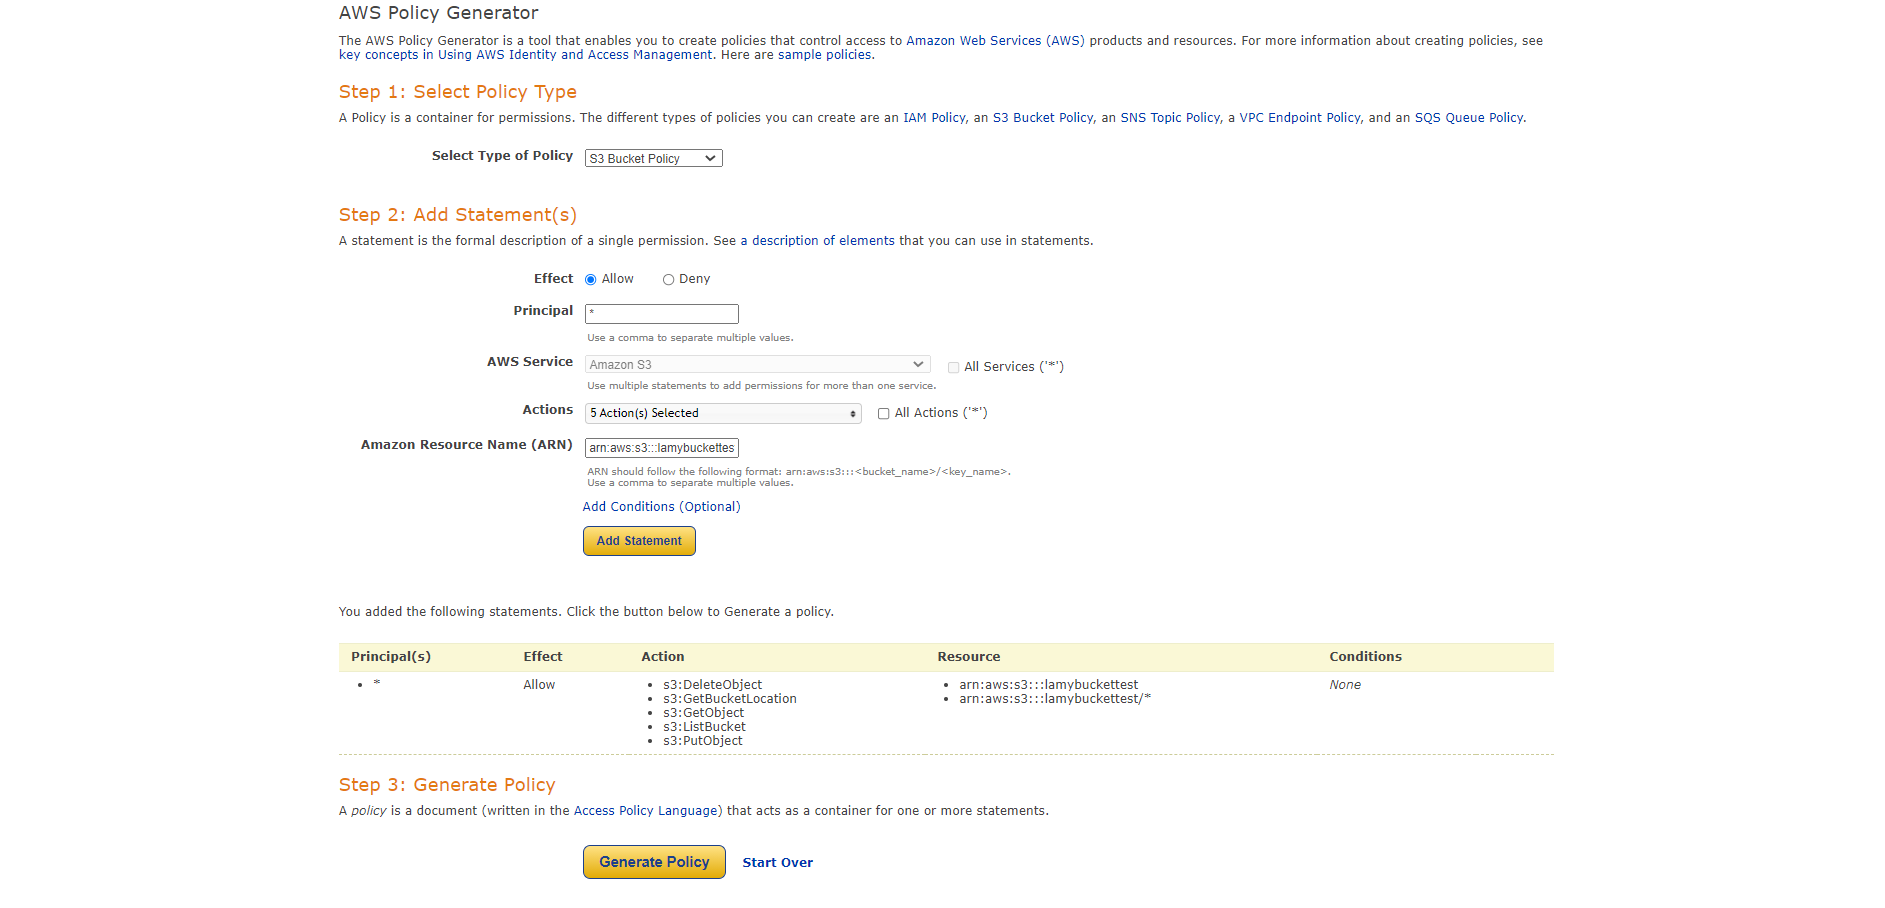
{
  "Id": "Policy1628443556664",
  "Version": "2012-10-17",
  "Statement": [
    {
      "Sid": "Stmt1628442118799",
      "Action": [
        "s3:DeleteObject",
        "s3:GetBucketLocation",
        "s3:GetObject",
        "s3:ListBucket",
        "s3:PutObject"
      ],
      "Effect": "Allow",
      "Resource": [
        "arn:aws:s3:::lamybuckettest",
        "arn:aws:s3:::lamybuckettest/*"
      ],
      "Principal": "*"
    }
  ]
}
4. Edit Cross-origin resource sharing (CORS)
Just in Permission Tab scroll down and you will see Cross-origin resource sharing (CORS) edit and place below json code there and save changes.
[
    {
        "AllowedHeaders": [
            "Authorization"
        ],
        "AllowedMethods": [
            "PUT",
            "POST",
            "GET"
        ],
        "AllowedOrigins": [
            "*"
        ],
        "MaxAgeSeconds": 3000
    }
]
5. Uploading Image to Amazon s3 with HTML
We need a html code for browsing file , Do this in your directory www or htdoc --> S3upload(Folder Create)--> index.php (File Create) (Copy below code) , S3upload(Folder Create)--> upload.php (File Create)<!DOCTYPE html> <html> <body> <form action="upload.php" method="post" enctype="multipart/form-data"> Select image to upload: <input type="file" name="userfile" id="userfile"> <input type="submit" value="Upload Image" name="submit"> </form> </body> </html>
6. Add AWS SDK via Composer
go to command line and then go to folder (s3upload) by cd and run the below command to install library aws-sdk-php , you can read Amazon Aws Read.composer require aws/aws-sdk-php
7. Upload File To Amazon S3 Php
You can place this below code and put in upload.php file and make sure to place your Bucket Name , region as per your aws ec2 instance. Because i am testing s3 upload from my localhost so http verify is false.
<?php

	require './vendor/autoload.php';
	use Aws\S3\S3Client;
	use Aws\S3\Exception\S3Exception;

	$bucketName = 'BUCKENAME';
	$IAM_KEY = 'KEY';
	$IAM_SECRET = 'SECREATKEY';

	try {
		$s3 = S3Client::factory(
			array(
				'credentials' => array(
					'key' => $IAM_KEY,
					'secret' => $IAM_SECRET
				),
				'version' => 'latest',
				'region'  => 'youregion',
				'http'    => [
					'verify' => false
				]
			)
		);
	} catch (Exception $e) {
		die("Error: " . $e->getMessage());
	}

	$uload_file=$_FILES["userfile"];
	$fileURL = $uload_file['name'];
	$tempFilePath=$uload_file['tmp_name'];

	$keyName = 'userprofile/' . basename($fileURL);
	$pathInS3 = 'https://s3.us-east-2.amazonaws.com/' . $bucketName . '/' . $keyName;

	try {
		$fileContents = file_get_contents($fileURL);
		$s3->putObject(
			array(
				'Bucket'=>$bucketName,
				'Key' =>  $keyName,
				'SourceFile' => $tempFilePath,
				'StorageClass' => 'REDUCED_REDUNDANCY'
			)
		);
	} catch (S3Exception $e) {
		die('Error:' . $e->getMessage());
	} catch (Exception $e) {
		die('Error:' . $e->getMessage());
	}
8. Uploading file to Amazon S3 Laravel
Before uploading file documents to Amazon S3 , we need to configure AWS Settings in laravel , kindly add below array in config\filesystems.php inside disks array .
's3' => [
	'driver' => 's3',
	'key' => env('AWS_ACCESS_KEY_ID'),
	'secret' => env('AWS_SECRET_ACCESS_KEY'),
	'region' => env('AWS_DEFAULT_REGION'),
	'bucket' => env('AWS_BUCKET'),
	'url' => env('AWS_URL'),
	'endpoint' => env('AWS_ENDPOINT'),
	'use_path_style_endpoint' => env('AWS_USE_PATH_STYLE_ENDPOINT', true),
	 'scheme' =>'http',
]
Add Below Code to .env configuration file
AWS_ACCESS_KEY_ID=Your_Access_Key
AWS_SECRET_ACCESS_KEY=Your_Secret_Key
AWS_DEFAULT_REGION=Your_Resion
AWS_BUCKET=BucketName
AWS_USE_PATH_STYLE_ENDPOINT=false
Your controller code goes like below
<?php

use App\Http\Controllers\Controller;
use Illuminate\Http\Request;
use Illuminate\Support\Facades\Storage;

class ImageUploadController extends Controller
{
    public function index(){
        return view('front.image_upload');
    }
    /**
     * Display a listing of the resource.
     *
     * @return \Illuminate\Http\Response
     */
    public function upload_post_image(Request $request)
    {
        $request->validate([
            'image' => 'required|image|mimes:jpeg,png,jpg,gif,svg|max:2048',
        ]);
        if($request->hasfile('image')){
            $file = $request->file('image');
            $imageName=time().$file->getClientOriginalName();
            $filePath = 'images/' . $imageName;
            Storage::disk('s3')->put($filePath, file_get_contents($file));
	        return back()->with('success','You have successfully upload image.');
        }
    }
}
Your laravel view will goes like below , You can make it proper , this is just a example for understanding. also add route to your web , so that you can access and process form submittion.
<html lang="en">
<head>
  <meta charset="utf-8">
  <link rel="stylesheet" href="https://maxcdn.bootstrapcdn.com/bootstrap/3.4.1/css/bootstrap.min.css">
  <script src="https://ajax.googleapis.com/ajax/libs/jquery/3.4.1/jquery.min.js"></script>
  <script src="https://maxcdn.bootstrapcdn.com/bootstrap/3.4.1/js/bootstrap.min.js"></script>
</head>
<body>
 <div class="container">
 <div class="row">
 </div>
        <form action="{{ route('upload.post.image') }}" method="POST" enctype="multipart/form-data">
            @csrf
            <div class="row">
                <div class="col-md-6">
                    <input type="file" name="image" class="form-control">
                </div>

                <div class="col-md-6">
                    <button type="submit" class="btn btn-success">Save To S3</button>
                </div>
            </div>
        </form>
 </div>
</body>
</html>