
Creating a Login, Logout, and Dashboard Screen in React Native
Creating a login and logout screen in React Native is an essential component of most mobile applications. It involves a combination of design, functionality, and security considerations. Authentication—the process of allowing users to securely access their accounts—is at the heart of most modern applications. In this article, we'll guide you through the entire process of creating a polished Login, Logout, and Dashboard screen in React Native. We'll cover everything from designing the login form to implementing navigation, handling API calls, and managing state with React Native’s built-in tools and libraries.
The process will involve several key steps:
- Designing the Login & Logout screens
- Implementing user authentication
- Creating a Dashboard screen for authenticated users
- Handling navigation between screens
- Using AsyncStorage for persistent data storage
We'll organize the project in a way that keeps things modular, creating reusable components and services for maximum flexibility. Here is an outline of the directory structure we'll use:
components/
│
├── NavigationContainer.js
├── CustomToastProvider.js
└── AuthProvider.js
services/
│
├── AuthService.js
└── ProfileService.js
The components folder will contain React components for the navigation, authentication logic, and UI elements like custom toasts for feedback. The services folder will include JavaScript files responsible for interacting with the backend API. For example, AuthService.js will handle the user authentication process, checking credentials, and storing session data in react-native-community/async-storage to persist user sessions. Similarly, ProfileService.js will be responsible for retrieving user profile data once authenticated.
It’s assumed that your React Native environment is set up on your local machine. If you haven’t done so yet, you can get started by following the Expo tutorial to create your first app.
Here’s a brief overview of the flow:
- The login screen will accept user credentials (username, password), authenticate them through an API call, and store the authentication token securely in AsyncStorage.
- The logout functionality will clear the stored data, effectively logging the user out and redirecting them to the login screen.
- The dashboard screen will display personalized information, such as the user’s profile data, once authenticated.
To provide better user experience, we'll implement features like custom error handling and success messages, and we’ll ensure secure storage of sensitive information.
Main App React File
First Below Will be your app.js file and in this file you can see we have wrapped
// App.js
import React, { useEffect, useState } from 'react';
import { NavigationContainer } from '@react-navigation/native';
import { createStackNavigator } from '@react-navigation/stack';
import { View, StyleSheet,Text,TouchableOpacity  } from 'react-native';
import SignInScreen from './src/screens/auth/SignInScreen';
import SplashScreen from './src/screens/SplashScreen';
import DashboardNavigator from './src/components/DashboardNavigator';
import { AuthProvider } from './src/components/AuthContext';
import CustomToastProvider from './src/components/CustomToastProvider';
const Stack = createStackNavigator();

const App = () => {

  return (
    <NavigationContainer>
    <CustomToastProvider>
     <AuthProvider>
            <View style={styles.container}>
                <Stack.Navigator initialRouteName="Splash" headerShown="false" >
                <Stack.Screen name="Loading" component={SplashScreen} />
                <Stack.Screen name="SignIn" component={SignInScreen} options={{ headerShown: false }} />
                <Stack.Screen name="Dashboard" component={DashboardNavigator} options={{ title: '',headerLeft: () => null,headerShown: true,headerTransparent: false,headerStyle: {backgroundColor: 'rgb(30, 144, 255)',elevation: 4,height:50 }}}/>
              </Stack.Navigator>
            </View>
     </AuthProvider>
     </CustomToastProvider>
     </NavigationContainer>
  );
};
const styles = StyleSheet.create({
  container: {
    flex: 1,
  },
});
export default App;
SignIn Screen Or Login Screen
Login form screen will have email and password as a form fields. we have imported AuthContext to access login function. When user click on signin or login button signIn() call api and validate user also store information in local storage if user is valid. For notification to the user for any succes or failture we used Toast Notification
// SignInScreen.js
import React, { useEffect, useState } from 'react';
import {
  Alert,
  Text,
  View,
  TextInput,
  TouchableOpacity,
  Image,
  KeyboardAvoidingView,
  Dimensions,
  ActivityIndicator,Keyboard
} from 'react-native';

import { useAuth } from '../../components/AuthContext';
import styles from "../../css/login";
import {apiUrl} from  '../../config/constants';

import { useToast, Toast} from "react-native-toast-notifications";
var height = Dimensions.get('window').height;
var width = Dimensions.get('window').width;

const SignInScreen = ({ navigation }) => {

  const toast = useToast();
  const [isLoading, setIsLoading] = useState(false);

  const { login } = useAuth();
  const [email, setEmail] = useState('');
  const [password, setPassword] = useState('');

  const handleReset = () => {
    setEmail('');
    setPassword('');
  };

  const signIn = async () => {
    Keyboard.dismiss();
    Toast.hideAll();
    try {
      setIsLoading(true);
      const user = { email: email, password: password };
      if (email && password) {
        const response = await login(user);
        if (response.status===1) {
              toast.show(
                response.msg,
                {
                  type: "custom_toast",
                  duration: 700,
                  data: {
                    title: "Success",
                  },
                }
              );
              handleReset();
             navigation.navigate('Dashboard');
          } else {
            toast.show(
              response.msg,
              {
                type: "custom_toast",
                duration: 700,
                data: {
                  title: "Error",
                },
              }
            );
            setIsLoading(false);
            handleReset();
            navigation.navigate('SignIn');
          }
        } else {
          toast.show(
            'Email and password are required.',
            {
              type: "custom_toast",
              duration: 700,
              data: {
                title: "Error",
              },
            }
          );
          navigation.navigate('SignIn');
        }
    } catch (error) {
      setIsLoading(false);
      handleReset();
      console.error('Error during login:', error);
      toast.show(
        'Email and password are required.',
        {
          type: "custom_toast",
          duration: 700,
          data: {
            title: "Error",
          },
        }
      );
    }finally {
      handleReset();
      setIsLoading(false);
    }
  };

  const handleSignUpPress = () => {
    navigation.navigate('SignUp');
  };

  const handleForgetPasswordPress = () => {
    navigation.navigate('ForgetPassword');
  };

  return (
    <View style={styles.mainContainer}>

    <KeyboardAvoidingView
      style={styles.container}
      behavior="padding"
    >

      <View style={(styles.row, styles.imageBox, styles.logo)}>
        <Image style={{ width: 190, height: 32 }} source={{ uri: apiUrl + 'assets/images/signin-logo.png' }} />
      </View>

      <View style={{ width: width - 90, alignItems: 'center', justifyContent: 'center' }}>
        <Text style={styles.pageTitle}>Login Here</Text>
      </View>
      {isLoading && <ActivityIndicator size="large" color="blue" />}
      <TextInput style={styles.inputBox}
        underlineColorAndroid='rgba(0,0,0,0)'
        placeholder="Email"
        placeholderTextColor="#999999"
        selectionColor="#000"
        keyboardType="email-address"
        onSubmitEditing={() => email.focus()}
        value={email}
        onChangeText={setEmail}
      />
      <TextInput style={styles.inputBox}
        underlineColorAndroid='rgba(0,0,0,0)'
        placeholder="Password"
        secureTextEntry={true}
        selectionColor="#000"
        placeholderTextColor="#999999"
        value={password}
        onChangeText={setPassword}
      />
      <View style={styles.scrollboxActionContainer}>
        <View style={styles.buttonSignup}>
          <TouchableOpacity onPress={signIn}>
            <Text style={styles.buttonSignupText}>Login</Text>
          </TouchableOpacity>
        </View>
      </View>
      <View style={{ flexDirection: "row" }}>
        <View style={{ flex: 1, paddingLeft: 10, }}>
          <TouchableOpacity style={{ alignSelf: 'stretch' }} onPress={handleSignUpPress}>
            <Text style={styles.button_1}>Create Account?</Text>
          </TouchableOpacity>
        </View>
        <View style={{ borderLeftWidth: 1, borderLeftColor: 'white' }} />
        <View style={{ flex: 1, paddingRight: 10 }}>
          <TouchableOpacity style={{ alignSelf: 'stretch' }} onPress={handleForgetPasswordPress}>
            <Text style={styles.button_2}>Forgot Password?</Text>
          </TouchableOpacity>
        </View>
      </View>

     </KeyboardAvoidingView>
    <View style={styles.signupTextCont}>
    </View>
  </View>
  );
};
export default SignInScreen;
Auth Context
To manage user authentication state across the application, integrate an Auth Provider using Context API.This centralizes authentication logic and enables seamless communication between components, ensuring a consistent user experience throughout the app. You can see that we have imported AuthService.js file. this file have functions axios which call api and response back.
// AuthContext.js
import React, { createContext, useContext, useEffect, useState } from 'react';
import AuthService from '../services/AuthService';

const AuthContext = createContext();

export const AuthProvider = ({ children }) => {
  const [authenticated, setAuthenticated] = useState(false);

  useEffect(() => {
    const checkAuthentication = async () => {
      const isAuthenticated = await AuthService.isAuthenticated();
      setAuthenticated(isAuthenticated);
    };

    checkAuthentication();
  }, []);

  const login = async (credentials) => {
        const response = await AuthService.login(credentials);
        if (response.status===1) {
            setAuthenticated(true);
            return response;
        } else {
          setAuthenticated(false);
          return response;
        }
  };

  const logout = async () => {
    await AuthService.logout();
    setAuthenticated(false);
  };

  return (
    <AuthContext.Provider value={{ authenticated, login, logout }}>
      {children}
    </AuthContext.Provider>
  );
};

export const useAuth = () => useContext(AuthContext);
AuthService
The purpose of this class is to provide methods for handling authentication-related tasks in a React Native application. It encapsulates functionality such as logging in, logging out, checking authentication status, and retrieving user data and authentication tokens.
login(credentials): This method takes user credentials (e.g., username and password) as input and attempts to log the user in by sending a request to the server. If the login is successful, it saves the user data and token locally and returns the server response. If there's an error during login, it throws an exception with an appropriate error message.
logout(): This method implements the logout logic by removing the user data and token stored locally. It doesn't require any input parameters and doesn't return anything.
isAuthenticated(): This method checks whether the user is currently authenticated by verifying the presence of a user token. It returns a boolean value indicating the authentication status.
getToken(): This method retrieves the authentication token from local storage and returns it. It's useful for making authenticated API requests.
getUserData(): This method retrieves user data from local storage and returns it. This data might include user information like username, email, etc.
// AuthService.js
import { saveUserData,saveUserToken,getUserToken,removeUserToken,removeUserData,getUserData } from '../components/storage';
import {apiUrl,axiosHeaders} from  '../config/constants';
import { post } from '../components/RequestCall';
class AuthService {
  async login(credentials) {
      try {
        const result = await post('/user/login/', credentials, axiosHeaders, apiUrl);
        if (result.status === 1) {
          saveUserData(result);
          saveUserToken(result.profile.userId);
          return result;
        } else {
           //console.error('Error fetching data:', result.msg);
           return result;
        }
      } catch (error) {
         //console.error('Error fetching data:', error);
         return { status: 0, msg: error.message };
      }
  }

  async logout() {
    // Implement logout logic here
    // Typically involves clearing the token from AsyncStorage
    removeUserData();
  }

  async isAuthenticated() {
    // Check if the user is authenticated
    // Typically involves checking if a token exists in AsyncStorage
    const token = await getUserToken();
    return !!token;
  }

  async getToken() {
    // Retrieve the authentication token from AsyncStorage
    return getUserToken();
  }

  async getUserData() {
    // Retrieve the authentication token from AsyncStorage
    return getUserData();
  }
}

export default new AuthService();
RequestCall utility
RequestCall React code defines utility functions for making HTTP requests using the Axios library.
//RequestCall.js
import axios from 'axios';
const post = async (endpoint, data = {}, headers = {}, apiUrl = '') => {
  try {
    const instance = axios.create({
      baseURL: apiUrl,
      headers: headers,
    });

    const response = await instance.post(endpoint, data);
    return response.data;
  } catch (error) {
    throw error;
  }
};

const postFormData = async (endpoint, data = {}, userId, headers = {}, apiUrl = '') => {

  try {
    const instance = axios.create({
      baseURL: apiUrl,
      headers: headers,
    });

    const formData =  new FormData();
    formData.append('photo', data);
    formData.append('userId', userId);

    const response = await instance.post(endpoint, formData);
    return response.data;
  } catch (error) {
    throw error;
  }
};

const get = async (endpoint, params = {}, headers = {}, apiUrl = '') => {
    try {
      const instance = axios.create({
        baseURL: apiUrl,
        headers: headers,
      });

      const response = await instance.get(endpoint, { params });
      return response.data;
    } catch (error) {
      throw error;
    }
  };
export { get,post,postFormData };
Storage Component
saveUserData: Saves user data to AsyncStorage under the key userData. It converts the data to a JSON string before storing it.
saveUserToken: Saves the user token to AsyncStorage under the key token. It also converts the token to a JSON string before storing it.
getUserData: Retrieves user data from AsyncStorage using the key userData. It parses the JSON string retrieved from AsyncStorage and returns the parsed data.
getUserToken: Retrieves the user token from AsyncStorage using the key token. It parses the JSON string retrieved from AsyncStorage and returns the parsed token.
removeUserData: Removes both user data and token from AsyncStorage by removing the corresponding keys (userData and token).
removeUserToken: Removes the user token from AsyncStorage by removing the key token.
removeSpecificKey: Removes a specific key from AsyncStorage.
saveToken: Saves a token with a custom key to AsyncStorage.
updateData: Updates the user data stored in AsyncStorage by merging it with the new value provided. If the user data contains a profile object, it updates the profile_photo property with the new value.
// storage.js
import AsyncStorage from '@react-native-community/async-storage';
const STORAGE_KEY = 'userData';
const TOKEN_KEY = 'token';
export const saveUserData = async (userData) => {
  try {
    await AsyncStorage.setItem(STORAGE_KEY, JSON.stringify(userData));
  } catch (error) {
    console.error('Error saving data to AsyncStorage:', error);
  }
};
export const saveUserToken = async (token) => {
  try {
    //await AsyncStorage.setItem(TOKEN_KEY, JSON.stringify(userData.token));
    await AsyncStorage.setItem(TOKEN_KEY, JSON.stringify(token));
  } catch (error) {
    console.error('Error saving data to AsyncStorage:', error);
  }
};
export const getUserData = async () => {
  try {
    const userDataString = await AsyncStorage.getItem(STORAGE_KEY);
    return JSON.parse(userDataString);
  } catch (error) {
    console.error('Error retrieving data from AsyncStorage:', error);
    return null;
  }
};

export const getUserToken = async () => {
  try {
    const token = await AsyncStorage.getItem(TOKEN_KEY);
    return JSON.parse(token);
  } catch (error) {
    //console.error('Error retrieving data from AsyncStorage:', error);
    return null;
  }
};

export const removeUserData = async () => {
  try {
    await AsyncStorage.removeItem(STORAGE_KEY);
    await AsyncStorage.removeItem(TOKEN_KEY);
  } catch (error) {
    console.error('Error removing data from AsyncStorage:', error);
  }
};

export const removeUserToken = async () => {
  try {
    await AsyncStorage.removeItem(TOKEN_KEY);
  } catch (error) {
    console.error('Error removing data from AsyncStorage:', error);
  }
};

export const removeSpecificKey = async (key) => {
  try {
    await AsyncStorage.removeItem(key);
  } catch (error) {
    console.error(`Error removing key ${key} from AsyncStorage:`, error);
  }
};

export const saveToken = async (key,value) => {
  try {
    await AsyncStorage.setItem(key,value);
  } catch (error) {
    console.error(`Error removing key ${key} from AsyncStorage:`, error);
  }
};


export const updateData = async (newValue) => {
  try {
    const existingValue = await AsyncStorage.getItem(STORAGE_KEY);
    if (existingValue !== null) {
      const parsedValue = JSON.parse(existingValue);

      if (parsedValue.profile) {
         parsedValue.profile.profile_photo = newValue.profile_photo;
      }

      const updatedValue = JSON.stringify(parsedValue);
      await AsyncStorage.setItem(STORAGE_KEY, updatedValue);

    } else {
      console.log(`Value with key ${STORAGE_KEY} doesn't exist in AsyncStorage`);
    }
  } catch (error) {
    console.error(`Error updating value with key ${key} in AsyncStorage:`, error);
  }
};
Constant Config
This is a constant file where you can place global constant which you need to inlcude in your mobile application.Where you can place all of your configuration constant.
//constants.js
export const apiUrl = "https://yourlearn.in/";
export const axiosHeaders = {
	'Accept': 'application/json',
	'Content-Type': 'application/json',
	'api-key': '123123',
	'user-id': '7574874873'
};
export const netErrorMsg = "You're not connected to the internet.\n Please connect and retry.";
export const axiosFlashMessageTimeOut = 3000;
export const alertInfoMessageTimeOut = 3000;
Custom Toast Provider Component
We need a component for alert message in react native application, We will use react native toast notifications, package for this purpose. The CustomToastProvider component appears to be a custom component used in your React Native application. Based on its name, it likely provides a context or a higher-order component to manage and display custom toast notifications throughout your app.It could create a React context to manage the state and functionality related to displaying toast notifications
// CustomToastProvider.js
import React from 'react';
import { ToastProvider } from 'react-native-toast-notifications';
import { MaterialCommunityIcons } from "@expo/vector-icons";
import { View, Text, TouchableOpacity } from 'react-native';

const CustomToastProvider = ({ children }) => {
  return (
    <ToastProvider
      placement="top" // You can adjust placement as needed
      dangerIcon={<MaterialCommunityIcons name="close" color="#fff" />}
      successIcon={<MaterialCommunityIcons name="check" color="#fff" size={18} />}
      offset={110}
      animationType= "zoom-in"
      toastStyle={{
        maxWidth: '90%',
      }}
      renderType={{
        custom_toast: (toast) => (
          <View
            style={{
              paddingHorizontal: 15,
              paddingVertical: 10,
              backgroundColor: "#fff",
              marginVertical: 4,
              borderRadius: 8,
              borderLeftColor: "#007bff",
              elevation: 3,
              borderLeftWidth: 6,
              justifyContent: "center",
              paddingLeft: 16,
            }}
          >
            <Text
              style={{
                fontSize: 14,
                color: "#333",
                fontWeight: "bold",
              }}
            >
              {toast.data.title}
            </Text>
            <Text style={{ color: "#000", marginTop: 2 }}>{toast.message}</Text>
          </View>
        ),
        with_close_button: (toast) => (
          <View
            style={{
              paddingHorizontal: 15,
              paddingVertical: 10,
              backgroundColor: "#fff",
              marginVertical: 4,
              borderRadius: 8,
              borderLeftColor: "#007bff",
              borderLeftWidth: 6,
              justifyContent: "center",
              paddingHorizontal: 16,
              flexDirection: "row",
              elevation: 3,
            }}
          >
            <Text style={{ color: "#000", marginRight: 16 }}>{toast.message}</Text>
            <TouchableOpacity
              onPress={() => toast.onHide()}
              style={{
                marginLeft: "auto",
                width: 25,
                height: 25,
                borderRadius: 5,
                backgroundColor: "#fff",
                justifyContent: "center",
                alignItems: "center",
              }}
            >
              <Text style={{ color: "#000", fontWeight: "500", marginBottom: 2.5 }}>
                x
              </Text>
            </TouchableOpacity>
          </View>
        ),
      }}
    >
      {children}
    </ToastProvider>
  );
};
export default CustomToastProvider;
Dashboard Navigator
Dashboard Navigator defines a React Native component called DashboardNavigator. It serves as a navigation drawer for the dashboard screens of a mobile application.Overall, this component creates a navigation drawer for the dashboard screens of the application, allowing users to navigate between different screens such as home, settings, sharing, and logout.
You can add manny screen const screens array and import at the top as you can already see others screens also imported.
//DashboardNavigator.js
import React, { useState, useEffect } from 'react';
import { Text,View,ScrollView,SafeAreaView,StyleSheet,Dimensions,useWindowDimensions   } from 'react-native';
import { createDrawerNavigator,DrawerItem } from '@react-navigation/drawer';
import CustomDrawerHeader from '../components/CustomDrawerHeader';
import { FontAwesome } from '@expo/vector-icons';
import HomeScreen from '../screens/DashboardScreen';
import SettingsScreen from '../screens/Accounts/BookView';
import ShareScreen from '../screens/Accounts/BookView';
import LogoutScreen from '../screens/LogoutScreen';
import AuthService from '../services/AuthService';

var height = Dimensions.get('window').height;
const Drawer = createDrawerNavigator();

const DashboardNavigator = ({ navigation,route }) => {

  const [defaultImage, setDefaultImage] = useState(null);
  const screens = [
    { name: "Home", component: HomeScreen,'icon':"home" },
    { name: "Settings", component: SettingsScreen,'icon':"cog" },
    { name: "Share", component: ShareScreen,'icon':"share" },
    { name: "Logout", component: LogoutScreen,'icon':"sign-out" },
  ];

  useEffect(() => {
    if (route.params && route.params.newPhotoUrl) {
      setDefaultImage(route.params.newPhotoUrl);
    }
  }, [route.params]);


  const signOut = async () => {
    try {
      await AuthService.logout();
      navigation.replace('SignIn');
    } catch (error) {
      console.error('Error signing out:', error);
    }
  };

  const  FlatListItemSeparator = () => {
    return (
      <View style={{ height: 1, width: "260%", backgroundColor: "#CED0CE",marginLeft:-150,borderBottomColor: '#ccc', marginTop: '4%' }} />
    );
  };

  return (

  <SafeAreaView style={styles.mainContainer} forceInset={{ top: 'always', horizontal: 'never' }}>

      <Drawer.Navigator
        initialRouteName={screens[0].name}

        screenOptions={{
          activeTintColor:'#FFF',
          drawerActiveTintColor: '#999',
          drawerInactiveTintColor: '#FFF',
          activeBackgroundColor:'#FFF',
          itemsContainerStyle: {
            marginVertical: 0,
          },
          iconContainerStyle: {
            opacity: 1
          },
          drawerLabelStyle: {
            fontSize: 12,
            fontFamily: 'notoserif',
            marginVertical: 0,
          }
        }}
        drawerContent={props => <CustomDrawerHeader {...props} defaultImage={defaultImage} />}
      >
        {screens.map((screen, index) => (
          <Drawer.Screen
            key={index}
            name={screen.name}
            component={screen.component}
            options={{
                drawerLabel: ({ focused, color, size }) => (
                  <View style={{  alignItems: 'flex-start', justifyContent: 'center', marginVertical: -9 }}>
                    <Text style={{ color: focused ? '#05508f' : '#999', }}>
                        <View style={{ flexDirection: 'row', alignItems: 'center'}}>
                            <FontAwesome name={screen.icon} size={12} color={focused ? '#05508f' : '#999'} />
                            <Text style={{ marginLeft: 15 }}>{screen.name}</Text>
                        </View>
                    </Text>
                    <FlatListItemSeparator />
                  </View>
              ),
              title: screen.name,
            }}

          />
        ))}
      </Drawer.Navigator>
    </SafeAreaView>

  );
};

const styles = StyleSheet.create({
  mainContainer: {
    flex: 1,
    backgroundColor: '#ffffff',
    alignItems: 'stretch',
    justifyContent: 'center',
    height: height,
  },
});
export default DashboardNavigator;
LogoutScreen
Logout screen will logout the user and clear storage.
// LogoutScreen.js
import React, { useEffect } from 'react';
import AuthService from '../services/AuthService';
const LogoutScreen = ({ navigation }) => {
  useEffect(() => {
    signOut();
  }, []);

  const signOut = async () => {
    try {
      await AuthService.logout();
      navigation.replace('SignIn');
    } catch (error) {
      console.error('Error signing out:', error);
    }
  };
  return null;

};
export default LogoutScreen;
Custom Drawer Header
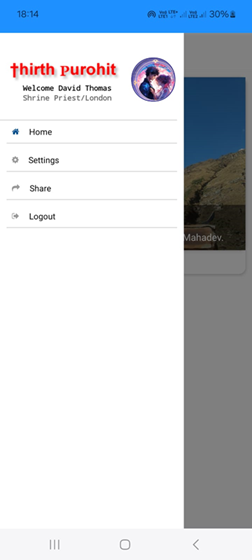
Custome drawer header is a component which will display app logo and user name and user type with there profile photo.
//CustomDrawerHeader.js
import React, { useEffect, useState } from 'react';
import { DrawerContentScrollView, DrawerItemList } from '@react-navigation/drawer';
import { View, Text, Image, StyleSheet ,TouchableOpacity} from 'react-native';
import {apiUrl} from  '../config/constants';
import AuthService from '../services/AuthService';

const CustomDrawerHeader = (props) => {

  const [userInfo, setUserInfo] = useState(null);

  useEffect(() => {
    const checkData = async () => {
      const userData = await AuthService.getUserData();
      if(userData){
        setUserInfo(userData.profile);
      }
    };
    checkData();
  }, []);

  return (

    <DrawerContentScrollView {...props} >
      <View style={styles.headerContainer}>
        <View style={styles.centerContainer}>
        <View style={styles.leftContainer}>
          <Image
              source={{ uri: apiUrl + 'assets/images/signin-logo.png' }}
              style={styles.logo}
            />
        </View>
          <View style={styles.userInfo}>
            <Text style={styles.welcomeText}>Welcome {userInfo?.username}</Text>
            <Text style={styles.userRole}>{userInfo?.usertypename}</Text>
          </View>
        </View>

        <View style={styles.rightContainer}>
           <View style={styles.avatarContainer}>
            <Image
              source={{ uri: props.defaultImage ? props.defaultImage : userInfo?.profile_photo}}
              style={styles.avatar}
            />
          </View>
        </View>
      </View>
      <FlatListItemSeparator />
      <DrawerItemList {...props} />
    </DrawerContentScrollView>
  );
};

const  FlatListItemSeparator = () => {
  return (
    <View style={{ height: 1, width: "150%", backgroundColor: "#CED0CE",marginLeft:-150,borderBottomColor: '#ccc', marginTop: '4%' }} />
  );
};

const styles = StyleSheet.create({
  headerContainer: {
    flexDirection: 'row',
    //borderBottomWidth: 1,
    //borderBottomColor: '#ccc',
    paddingBottom:15,
    paddingTop:1,
  },
  leftContainer: {
    flex: 1,
    flexDirection: 'row',
    alignItems: 'center',
  },
  centerContainer: {
    justifyContent: 'center',
    alignItems: 'center',
    //marginLeft: 10,
  },
  rightContainer: {
    flexDirection: 'row',
    alignItems: 'center',
  },
  logo: {
    width: 200,
    height: 40,
    resizeMode: 'contain',
  },
  userInfo: {
    marginLeft: 5,
  },
  welcomeText: {
    fontSize: 12,
    fontWeight: 'bold',
    fontFamily: 'monospace',
    textAlign:'center'
  },
  userRole: {
    fontSize: 12,
    color: '#666',
    fontWeight: 'bold',
    fontFamily: 'monospace',
  },
  avatarContainer: {
    borderWidth: 1,
    borderColor: '#000',
    borderRadius: 32,
    borderColor: 'navy',
  },
  avatar: {
    width: 65,
    height: 65,
    borderRadius: 32,
  },
});
export default CustomDrawerHeader;
Dashboard Screen
Below is dashboard screen when authorization is successfull. it will show dashboard with navigation drawer. On click signout local sotorage will be cleared and then redirect to login or sign in form or screen.
//DashboardScreen.js
import React from 'react';
import { View, Text,Button  } from 'react-native';
import { useAuth } from '../services/AuthContext'
const DashboardScreen = ({ navigation }) => {
  const { state, logout } = useAuth();
  if (!state.isAuthenticated) {
    navigation.navigate('Login');
    return null;
  }
  const handleLogout = () => {
    logout();
    navigation.navigate('Login');
     return null;
  };
  return (
    <View>
      <Text>Welcome, {state.user.username}!</Text>
      <Text>Dashboard Screen</Text>
      <Button title="Logout" onPress={handleLogout} />
    </View>
  );
};
export default DashboardScreen;
Conclusion:
Creating a login/logout screen in React Native is a fundamental aspect of building secure and user-friendly mobile applications. By prioritizing design, functionality, and security considerations, developers can ensure a seamless authentication experience for app users.